صيانة اللاب توب ( الكمبيوتر المحمول ) Laptop Repair Workshop


qazxswedccc
:: مهندس ::
تاريخ التسجيل: Jun 2007
المشاركات: 24
نشاط [ qazxswedccc ]
قوة السمعة:
قديم 08-05-2008, 02:56 PM المشاركة 9   
افتراضي خلى سوكت الشحن برة بتاع اللاب توب لوكان متهالك ازى ,,؟؟؟


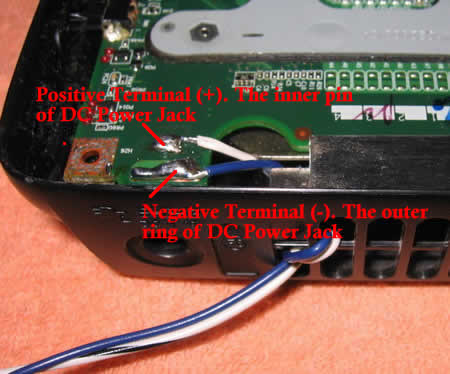
• Coil the pair of wire one round through the ventilation grill before taking it out as shown in the picture above. This is to prevent any external shock or force being directly transmitted to the soldering joints.
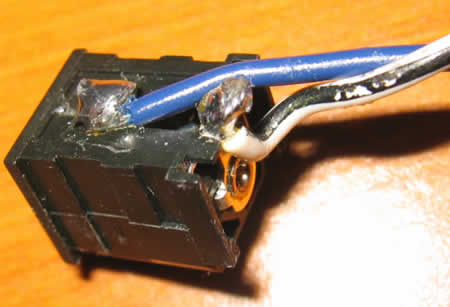
• Now we need to connect a new DC Jack to other end of the wire. I purchased the new DC jack from ebay for a price of $6. Shown in the picture above the white wire is the positive terminal (+) and hence must connect to the inner ring of the DC Jack. Similarly the blue wire being the negative terminal (-) should connect to the outer ring of the DC jack. Refer the picture below on how the wires are soldered to the DC Jack. Be careful not to short the leads as they are very close.
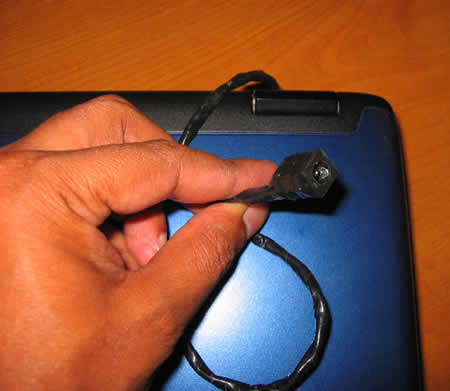
• Now neatly wind a round of insulation tape over the wire and especially on the exposed DC Jack exterior. This will prevent any short-circuit and also give a better appearance.

اعلانات

qazxswedccc
:: مهندس ::
تاريخ التسجيل: Jun 2007
المشاركات: 24
نشاط [ qazxswedccc ]
قوة السمعة:
قديم 08-05-2008, 03:05 PM المشاركة 10   
افتراضي مشكلة خاصة بجهاز توشيبا Toshiba Satellite M35X, A70 or A75 locks up


المشكلة عبارة عن انك لما تيجى تلمس السمعات او جنب السمعات الجهاز يهنج ولازم تعملو ريستارت او العكس يعمل ريستارت لوحدو لما تلمس المنطقة اللى جنب السماعات


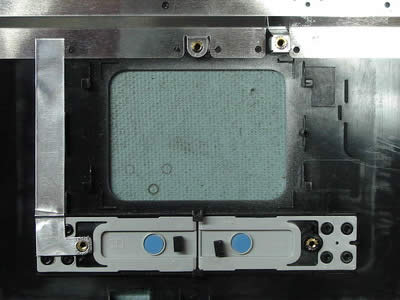
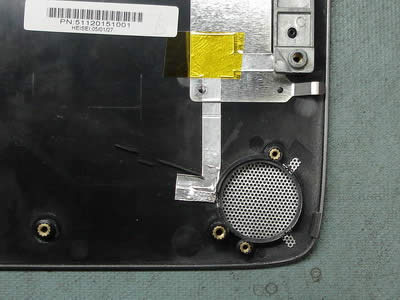
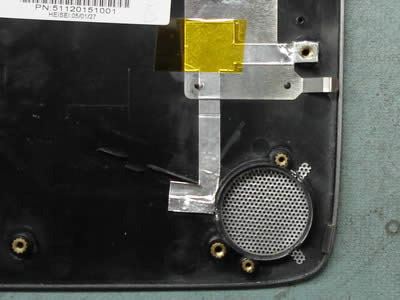
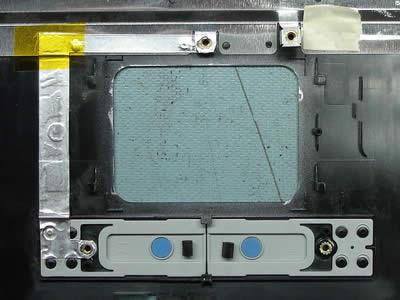
You laptop might lock up, freeze up or even reboot by itself when you touch the palm rest around the speakers area. It happens because of a static electricity discharge when your touch the laptop speakers. In some cases you will not even fill that discharge. The problem occurs because of improperly grounded top cover assembly. To fix the problem, it is necessary to install a new modified top cover assembly. If you laptop was made before January 2005 then most likely you have unmodified top cover. For example, I made some pictures from a Toshiba Satellite A75 top cover assembly. The top cover for Toshiba Satellite M35X is almost identical.
On these pictures you see unmodified top cover assembly for Toshiba Satellite A75. The foil runs from the speaker and from the touchpad to the metal chassis.


On these pictures you see a modified top cover assembly. The foil runs from the speaker and the touchpad, touches the metal chassis and ends on a screw stud.

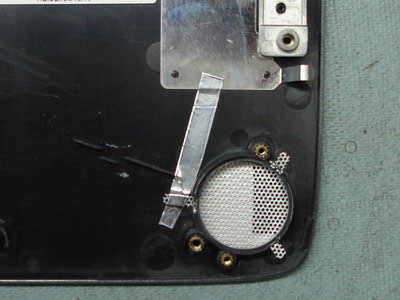
On this picture I remove the metal bracket, so you can see where the foil tape is connected.


I think it is possible to make this modification yourself. All you need is to find a foil and run it as it shown on the pictures. I have never done it myself, so not sure about

اعلانات اضافية ( قم بتسجيل الدخول لاخفائها )

الصورة الرمزية محمد البدوي
محمد البدوي
:: عضو فضي ::
تاريخ التسجيل: Aug 2007
الدولة: Moscow
المشاركات: 1,209
نشاط [ محمد البدوي ]
قوة السمعة:
قديم 08-05-2008, 03:56 PM المشاركة 11   
not funny


وفقك الله ووالديك لمافيه الخير لكم ولما يحب ويرضي
واحب اقولك اننا لي الشرف ان اكون اول من يري موضوع معاليك واللي هو رووعة فعلا


معتز جلال
:: عضو .. ::
تاريخ التسجيل: May 2007
المشاركات: 5
نشاط [ معتز جلال ]
قوة السمعة:
قديم 08-05-2008, 08:23 PM المشاركة 12   
افتراضي


بجد بجد ربنه يكرمك يا باش مهندس
والله معلومات قيمه بجد
ربنه يكرمك ويهدينا اجمعين
ولو ينفع نكون اصدقاء لان معرفه الناس كنوز
اخوك معتز جلال
ده اميلى لو تقبل نكون اصدقاء
gego1100*yahoo


mohamed.mostafa
:: مهندس متواجد ::
تاريخ التسجيل: Mar 2008
الدولة: 01141028333
المشاركات: 147
نشاط [ mohamed.mostafa ]
قوة السمعة:
قديم 08-05-2008, 11:06 PM المشاركة 13   
افتراضي


سبحان الله
لماذا لا يتم عرض مواضيعي ارجو الرد من قبل الادارة الكريمة ممكن؟؟؟
ايميلي mohamed.mostafa87********com


qazxswedccc
:: مهندس ::
تاريخ التسجيل: Jun 2007
المشاركات: 24
نشاط [ qazxswedccc ]
قوة السمعة:
قديم 11-05-2008, 05:11 PM المشاركة 14   
افتراضي


متشكر جدا ياجماعة وبجد انا عمرى مااشتركت فى منتدى خالص ولأنى بجد حسيت انو المنتدى دة مفيد جدا وخصوصا الناس اللى دايما بتسعى وراء التكنولوجيا ودايما بتحب تتعلم فققرت انى اكون عضو فعال بينكم وان شاء اللة هنعمل مواضيع تانية كتير عشان كلو يستفيد ومحدش يحتكر المعلومة لأنو فى مصر خصوصا فى بعض المجالات وزى اللاب توب الناس مبتديش معلومة عنو خالص ولو ادى بتكون غلط فأتمنى من كل الناس انها تشترك وكل واحد يحط اللى عندو عشان كل الناس تستفيد تقبلو مرورى تحياتى لكل اعضاء المنتدى وهنستكمل الشرح بأذن اللة


التعديل الأخير تم بواسطة : qazxswedccc بتاريخ 11-05-2008 الساعة 05:46 PM

qazxswedccc
:: مهندس ::
تاريخ التسجيل: Jun 2007
المشاركات: 24
نشاط [ qazxswedccc ]
قوة السمعة:
قديم 11-05-2008, 06:41 PM المشاركة 15   
افتراضي ازى تركب زرار لوحة المفاتيح بتاعة اللاب توب لما تقع من اللوحة يعنى مش هتشترى لوحة


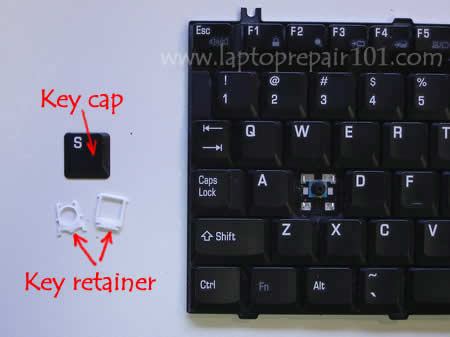
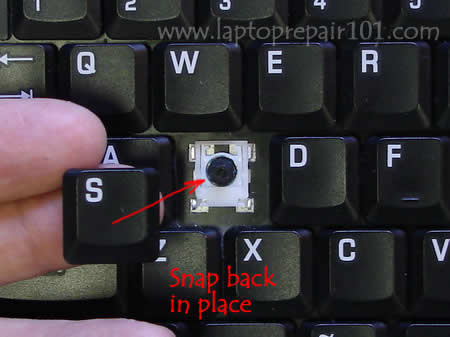
One or more keys fell off the laptop keyboard and you are not sure how to put them back? Don’t worry, most likely you can fix the keyboard and it’s not necessary to buy a new one. There is no universal repair guide because all keyboards are different. Here’s what I usually do in this case.
Situation 1. The key cap and key retainer fell off the keyboard and you cannot figure out how to assemble them back.

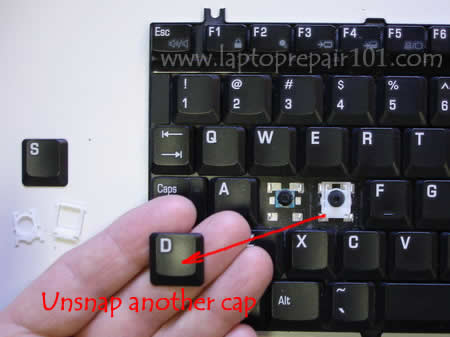
Carefully remove the cap from any other working key so the key retainer stays connected to the keyboard.

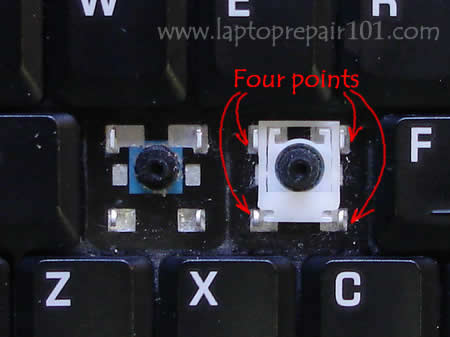
Take a closer look at the key retainer, it’s connected to the keyboard at four different points.
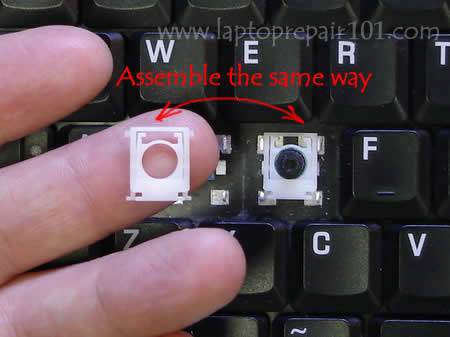
Assemble the disconnected retainer the same way as one on the keyboard and put it back in place.
Put the key cap on the retainer and snap the cap back in place.
Situation 2. The key fell off the keyboard and you lost the cap or the retainer. In this case you can purchase a single key eBay, just search for it. (Search examples: “Dell keyboard key”, “Toshiba keyboard key”, “HP keyboard key”, etc… )
After you found a new key, put it back in place the same way as I described in the situation 1.
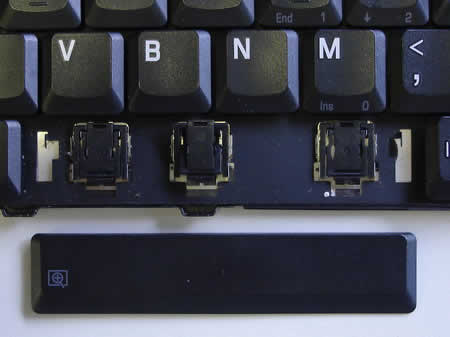
Update. Installing the space bar key.
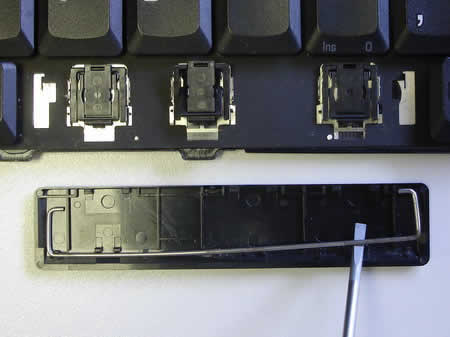
The space bar key is connected to the keyboard a little bit differently then any other key.

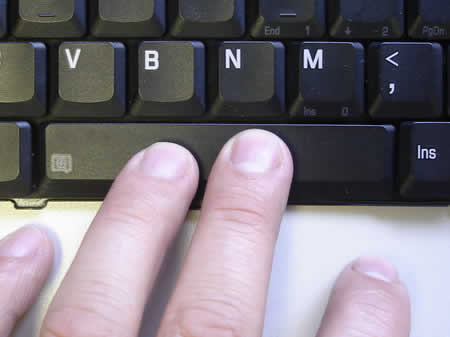
There is a metal retainer connected to the space bar key (on some keyboard models). Separate the retainer from the space bar key with a flathead screwdriver.

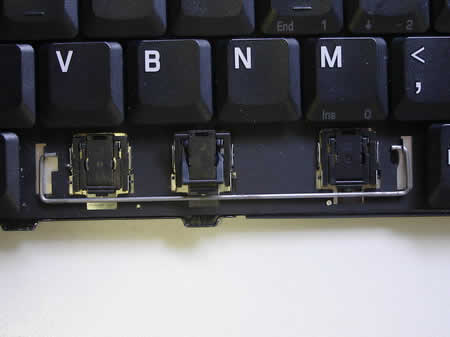
Install the retainer back in place as it shown on the picture. You have to engage the retainer with the small hooks on the keyboard.

Put the space bar key back in place and gently press on it with fingers until it snaps back in place.

That’s it. The space bar key is installed back in place and should work as before. If


qazxswedccc
:: مهندس ::
تاريخ التسجيل: Jun 2007
المشاركات: 24
نشاط [ qazxswedccc ]
قوة السمعة:
قديم 11-05-2008, 06:49 PM المشاركة 16   
افتراضي تعالو نتعلم ازى نغير لوحة مفاتيح بتاعة اللاب توب


These instructions will help you to remove and replace keyboards on various laptops. I will not be able to cover all models but you’ll get the idea. Steps for removing and replacing the keyboard are similar for most laptops.
Warning!
- if your laptop is still covered by the manufacturer’s warranty, do not open the case or you can loose the warranty
- always remove the battery and unplug the AC adapter before you open the laptop case
- if you damage the keyboard connector on the motherboard you’ll have to replace the whole motherboard
- proceed on your own risk
Sony laptop
I took these pictures from a Sony Vaio PCG-K33 (model PCG-9S1L) notebook. Should be similar for some other Sony notebooks too.
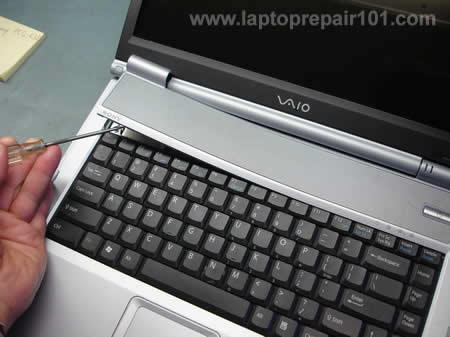
Insert a small flathead screwdriver under the keyboard bezel and carefully lift it up. Continue releasing plastic latches and removing the keyboard bezel with your fingers.
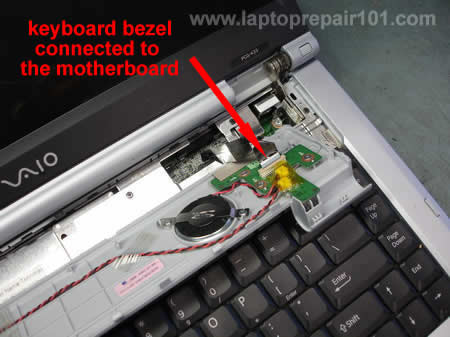
Be careful, on some models the bezel might be connected to the motherboard as it shown on the picture above. If you accidentally pulled the cable, connect it back. It is not necessary to disconnect the keyboard bezel from the motherboard in order to remove and replace the keyboard, just put it aside so you can access the keyboard screws.
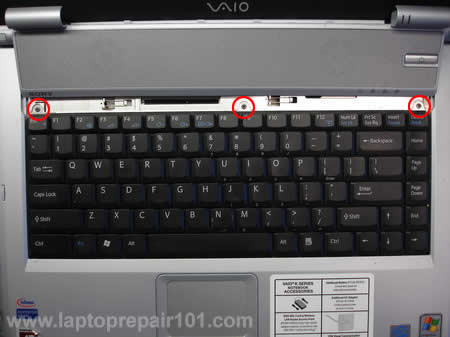
Remove three (or more) screws from the top of the keyboard. Carefully lift up the keyboard from the laptop case.
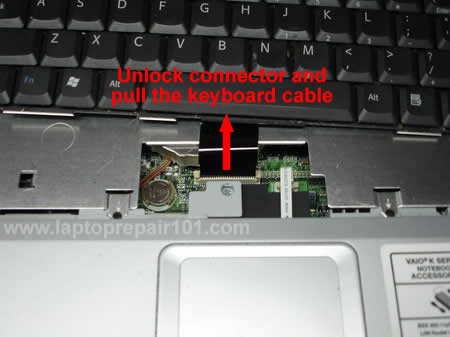
The keyboard connects to the motherboard via a flat ribbon cable. Before you pull the cable from the connector, you’ll have to unlock the connector.
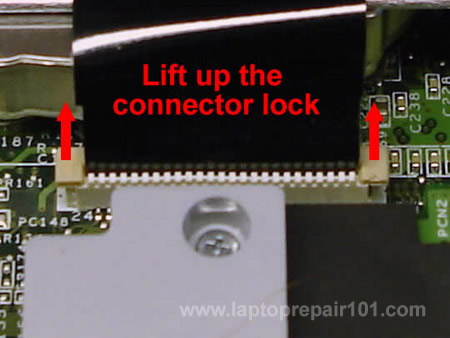
The image above illustrates how to unlock the keyboard connector. Carefully move the connector lock 2-3 millimeters up and after that pull the keyboard cable. To install the keyboard, follow the above mentioned steps in the reverse order.
Toshiba laptop
The following pictures were taken from a Toshiba Satellite A135 laptop. The keyboard removal instructions will be almost the same for most modern Toshiba laptops.
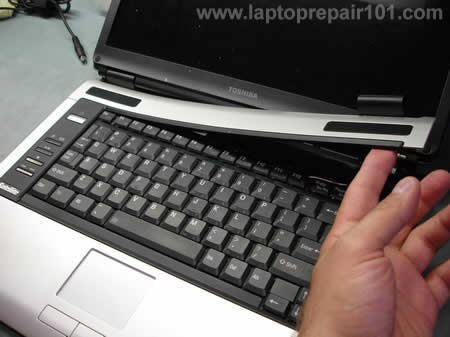
The keyboard bezel removal procedure is similar to the above mentioned Sony Vaio laptop. Lift it up with a small screwdriver and remove using fingers. On most Toshiba laptops the keyboard bezel doesn’t have any circuit board underneath, it’s just a piece of plastic and you don’t have to worry about cables.
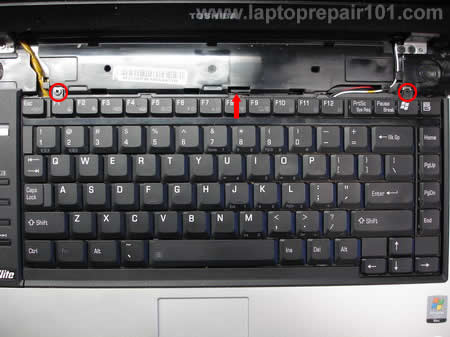
After the bezel is removed you get an access to the keyboard screws. Remove two (or more) screws. Release the plastic latch pointed with the red arrow and lift up the keyboard. Carefully put the keyboard aside so you can access the connector underneath the keyboard. Do not forget that the keyboard is still connected to the motherboard.
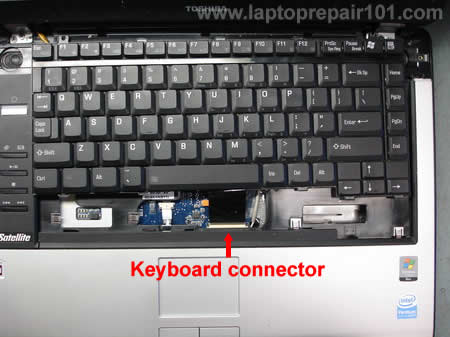
Before you remove the keyboard, you’ll have to open the connector and release the flat ribbon cable.
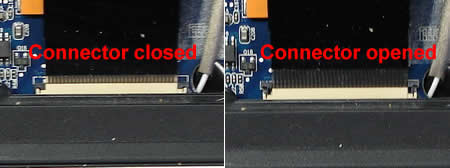
Here’s a closeup picture of the keyboard connector on the motherboard. Be careful, this type of connector is fragile. On the left image the connector is closed. On the right image the connector is opened. Unlock the connector by moving the lock up as it shown on the right image and after that release the ribbon cable. Remove and replace the keyboard. For assembly instructions follow all the steps in the reverse order.


الساعة معتمدة بتوقيت جرينتش +3 الساعة الآن: 01:06 AM
موقع القرية الالكترونية غير مسؤول عن أي اتفاق تجاري أو تعاوني بين الأعضاء
فعلى كل شخص تحمل مسئولية نفسه إتجاه مايقوم به من بيع وشراء وإتفاق وأعطاء معلومات موقعه
التعليقات المنشورة لا تعبر عن رأي موقع القرية الالكترونية ولايتحمل الموقع أي مسؤولية قانونية حيال ذلك (ويتحمل كاتبها مسؤولية النشر)